PowerShell 7 is supported on M1 macOS. You can install it on your M1-based Mac to utilize the powerful command-line tool and enhance your scripting capabilities. So, if you want to install PowerShell 7 on Mac then the best option is to check the Homebrew version, which is the best OS package manager.
Then you can download PowerShell from Homebrew or can also do it from Binary Archives. PowerShell is a command line tool that is developed by Microsoft, which is mainly used for system automation management.
The main task of PowerShell is to help automate mundane, which mainly helps to improve the efficiency of the Administrator’s workflow. With just the installation of powershell on mac m1, you will analyze many changes and things will become more convenient for you. It also helps to build tools to let your repetitive tasks done when you are focusing on some other bigger projects.
As it can also be used for building, testing, and deploying solutions mainly in CI environments. Apart from that, it is also a scripting language that mainly helps to build tools that you require during your work time. In addition to that, PowerShell can also be installed on Mac, Linux, and Windows 7.
The best thing for Mac users is that it supports both Intel-based and M1 Mac OS, so things will be very convenient for everyone. But make sure that it is available for Mac 10.13 or higher. So, just stay with us in this article and get all the relevant information about how you can install PowerShell 7 on M1 Mac OS.
How Do I Install PowerShell On Mac?
To install PowerShell on Mac, users can check the brew version, which is an OS package browser or you can also go for installing PowerShell directly from binary archives.
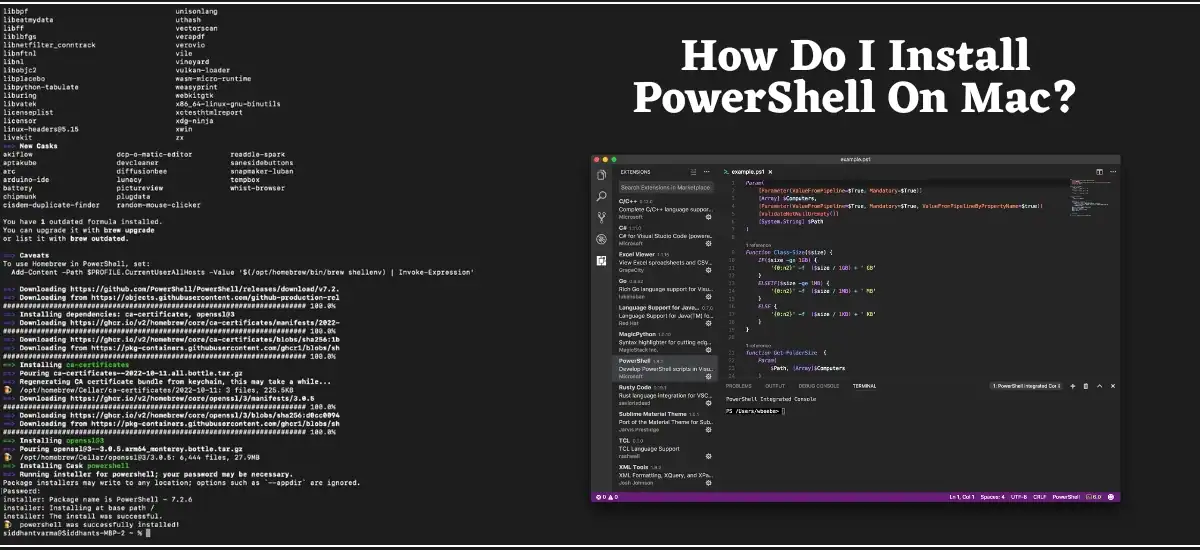
The best and recommended way to download PowerShell is to do it by using the Terminal app to download Homebrew. The best thing about this process is that if there is any update then you can also do it directly from the Terminal app.
How Do I Run PowerShell On Mac?
To run PowerShell on Mac, users can directly download the .pkg file from the Microsoft website or can also download it from Homebrew. Once you have installed PowerShell, now you can open it through the terminal window and can execute the pwsh command.
Once you have installed PowerShell on your Mac OS, now you can use it anytime by using the pwsh command. After executing this command on Terminal, now you can easily build your automation tools by using PowerShell script for the work you are doing.
Guide On : Your Saviour Guide To Netflix Error
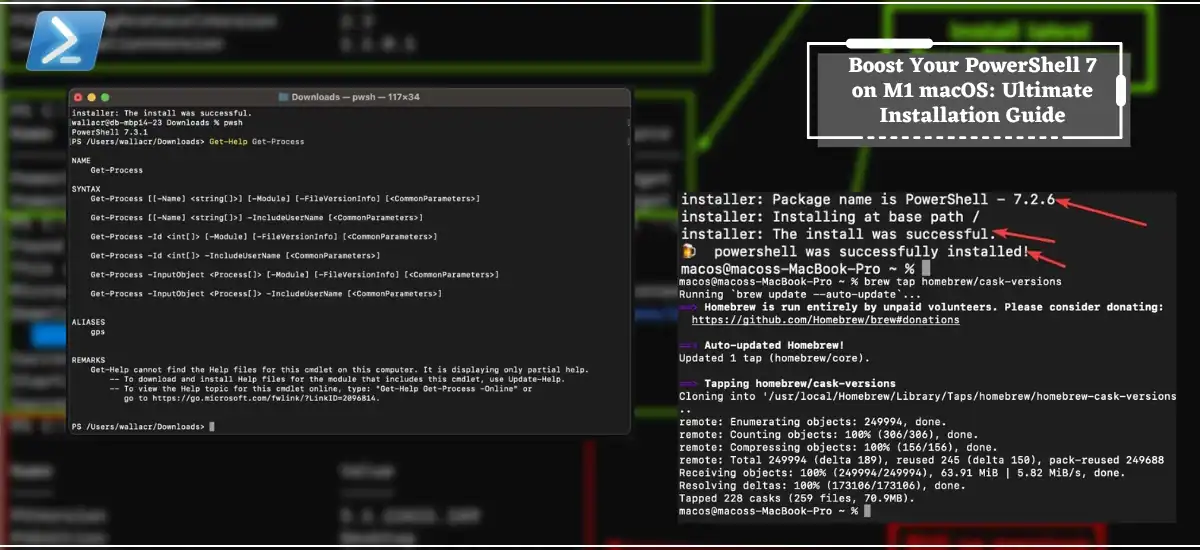
How To Install PowerShell 7 On M1 MacOS
To install PowerShell 7 on M1 Mac OS, users need to follow a compare process. But at first, users should go with the Homebrew version because it is the most preferred OS package manager.
So just download Homebrew from your Mac’s terminal and just use the Brew install cask PowerShell terminal command so that you can install PowerShell on Mac OS. In general, there are three ways to install PowerShell 7 on Mac OS, users can install it directly from the pkg file.
Another way is to do it directly through binary archives and the last and the most preferred way is to go through the Homebrew version. The process of installing powershell for mac m1 through Homebrew is an easy task because users just need to follow some basic terminal commands. If you don’t know how to do it, then just follow the steps
- First of all, users need to go to Applications and then on the Utilities option to open the Terminal command.
- Thereafter, you just need to copy the command we have given below and paste it directly into the terminal command. /bin/bash -c “$(curl -fsSL https://raw.githubusercontent.com/Homebrew/install/HEAD/install.sh)”
- After pasting this command, now the next step is to press Enter. But it may ask you to enter the admin password before the command gets executed.
- So just type the password, make sure that the password will be hidden and you will feel that nothing is written on the screen. But due to privacy, it is hidden, so just type the password and press the Enter key, and it will start executing the command to install Homebrew.
- Once Homebrew is installed, now the next step is to run the next command to install PowerShell. You might be required to enter the password again and then paste the command brew install –cask powershell.
- At last, just enter the pwsh command to enter PowerShell and make sure that it is working properly.
That’s it, by just following the above step, users can install PowerShell 7 on M1 Mac OS. We have given everything step-by-step so that you don’t have to face any issues. But still, if you have any queries then you can ping us in the comment section.
Frequently Asked Questions
Q1. Should I upgrade to PowerShell 7?
Ans. Yes, you should upgrade to PowerShell 7 if you want some new improvements and support for modern alternatives.
Pipeline Paralyzation is the latest update that we have seen in PowerShell 7 and it is a part of a stable release. Apart from this feature, the PowerShell 7 also allows running several scripts at the same time for every piped-out.
Q2. How do I make PowerShell 7 default?
Ans. To make PowerShell 7 default, users need to press the down arrow and then head to the Main Settings. A JSON file will open where you will see a parameter, which is mainly called default profile with a UUID. You just need to copy that UUID and paste it into the default profile.
Q3. How do I open PowerShell 7 in Explorer?
Ans. Users can open PowerShell 7 in Explorer via File Menu. For that, users need to press the Alt key and then press the F key to open the File Menu. Now just press the S key and it will open PowerShell and other sub-menu. At last, just press the R key to open PowerShell in the current directory.
Read More:-